Installation
Pattern Selection
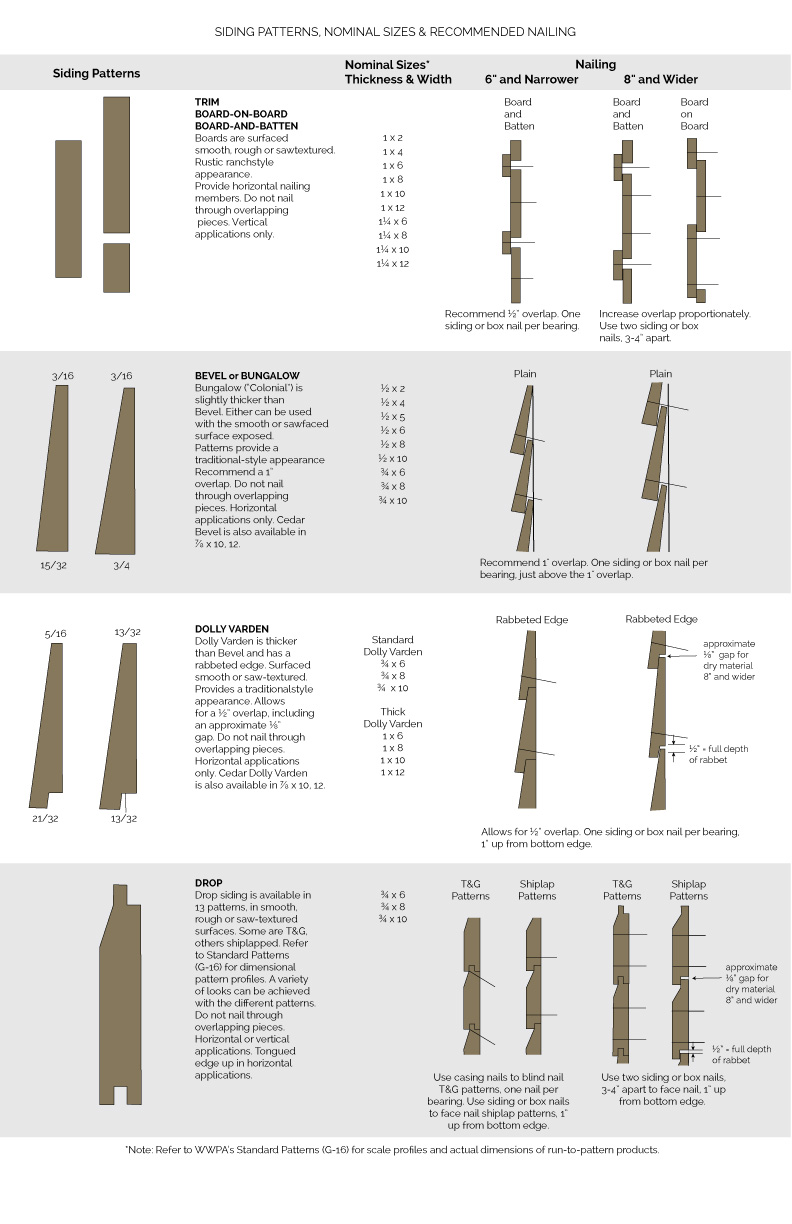
Boards in standard dimensions can be readily used for such siding applications as board-and-batten or board-on-board. However, most siding products are milled or run to a pattern.
Standard patterns are published by the rules-writing agencies to encourage uniformity and to serve as a common reference throughout the industry. The popular patterns are bevel or bungalow, Dolly Varden and channel.
WWPA’s Standard Patterns can be downloaded from www.wwpa.org.) Patterns not only allow for different effects in design and appearance but also affect performance.
Patterns like tongued-and grooved, which are primarily paneling patterns, should only be installed in exterior applications where the greatest degree of protection from climatic conditions can be provided. Tongued-and-grooved patterns allow for very little dimensional change as the siding acclimates to the environment, or as a result of seasonal dimensional adjustments. Climate, humidity levels, architectural detailing and exposure to prevailing weather conditions should all be considered when selecting a pattern.
As a rule of thumb, narrow patterns perform best because there is less dimensional change in the siding as the environment changes from wet to dry, or from the freezing conditions of winter to the blistering heat of late summer.
Thicker patterns have less tendency to cup or split than do thinner patterns. Siding surfaces are manufactured smooth, rough, or saw-textured. The type of surface and pattern, in combination with the finishing material, will affect performance. In general, saw-textured surfaces hold finishes longer than smooth surfaces.
Moisture Content
As wood loses or gains moisture, it will shrink or swell until it reaches equilibrium with the level of moisture in the air of its immediate surroundings. Because of its cell structure, wood shrinks primarily in thickness and width and very little in length.
Wood siding is no exception. It will shrink and swell regardless of pattern or material quality. Problems can occur after installation if the siding shrinks or swells unevenly or very rapidly, particularly if it has been improperly nailed and its natural movement has been restricted. However, problems such as twist, cup, warp, splits and checks can be minimized.
To avoid potential problems and to minimize dimensional change after installation, the moisture content of the siding should match the local climate as closely as possible at the time of installation.
For instance, if the climate in a particular region causes wood to maintain 9% to 14% moisture content, then the moisture content of the siding should be within that range when installed.
Siding can be dried at the time of manufacturing to a variety of moisture content levels or it can be shipped from the mill unseasoned or green. Unseasoned or green wood has a moisture content of more than 19%.
Dry wood will be at a maximum moisture content of 19% or 15%. Dry siding will take less time to acclimate to the air of its final surroundings and it will have less dimensional change, before and after installation, than unseasoned or green siding.
When ordering siding, specify the required moisture content level, but keep in mind the reality of the marketplace: premium grades of siding are readily available dry; some knotty grades are available dry.Remember too, dry has a different meaning for the premium grades than it does for the knotty grades.
Dry for the premium grades means that the siding has been dried to a maximum of 15% moisture content (MC 15). In addition, under WWPA rules, MC 15 means that at least 85% of the pieces in the order will be at a moisture content of 12% or less.
When knotty grades are dried at the mill, the siding is air- or kiln dried so that it will not exceed 19% moisture content. Thus, dry knotty siding will have a moisture content of 19% or less and may be grade-stamped ‘‘S-DRY’’ or “KD”. However, knotty grades can be specified MC 15 or KD 15, and are available through a buyer/seller agreement, when a maximum moisture content of 15% is desired.
Method of Drying — Lumber may be air dried or kiln dried. These terms do not necessarily refer to a specific moisture content but refer instead to the method used for drying. Air dried lumber has been seasoned by exposure to the atmosphere, without artificial heat. Kiln dried lumber has been seasoned in a chamber with the use of artificial heat. To assure compliance with a moisture content level, a moisture percentage should always be referenced.
Siding Storage — All siding may pick up or lose moisture in transit or storage so it is important to allow it to acclimate with the surrounding air of its final site prior to installation.
Stack the siding on evenly spaced, vertically aligned stickers (spacers between the layers) in an area where there will be good air flow through the stack. This should be done in an open garage or other area that is protected from the elements.
If stacked over concrete, use 2x4s or 2x6s on edge to elevate the first course of siding at least 3¹⁄₂ inches above the surface of the concrete. If the stack is over wet ground or wet concrete, lay down a vapor barrier so the wood doesn’t pick up moisture from beneath the stack.
Allow air to flow through and around the stack for a week to 10 days for dry siding, prior to installation. Extend the time period to 30 days or longer, for unseasoned siding or if acclimating in exceptionally humid conditions.
Further precautions must be taken if unseasoned or green materials, with a moisture content of more than 19%, are to be used successfully:
1) Allow materials to acclimate, as described, over a longer period—at least 30 days and longer in damp or humid conditions—before installation.
2) Use patterns which allow for some shrinkage, such as bevel, channel or board-and-batten. These patterns have a profile that includes a gap that can more easily accommodate dimensional change.
3) Use as narrow a width as possible. Dimensional change is proportional; the wider the width, the greater the change.
Priming and Pre-finishing
Often, material which has been properly seasoned, stored and handled will pick up moisture after installation but prior to finishing. Later, when the siding loses that moisture, joints may open up.
Research from the U.S. Forest Products Lab indicates that siding exposed to the elements for two weeks weathers enough to reduce the adhesion of film-forming finishes.
Priming or pre-finishing the siding (all sides, edges and cut ends) after it has reached climatic balance but before it is installed can provide extra protection and often prevent adhesion problems and/or premature finish failure.
Back-priming the siding eliminates the leaching of chemical extractives, which have the potential to degrade sheathing wraps.
Prefinishing is recommended in all circumstances. Prefinishing will minimize objectionable unfinished lines where joints open up due to face width shrinkage during exceptionally dry summers.
Make certain the prefinish is compatible with the final coat. For example, clear water repellents should not be used if a bleaching oil is to be the final finish.
Installation
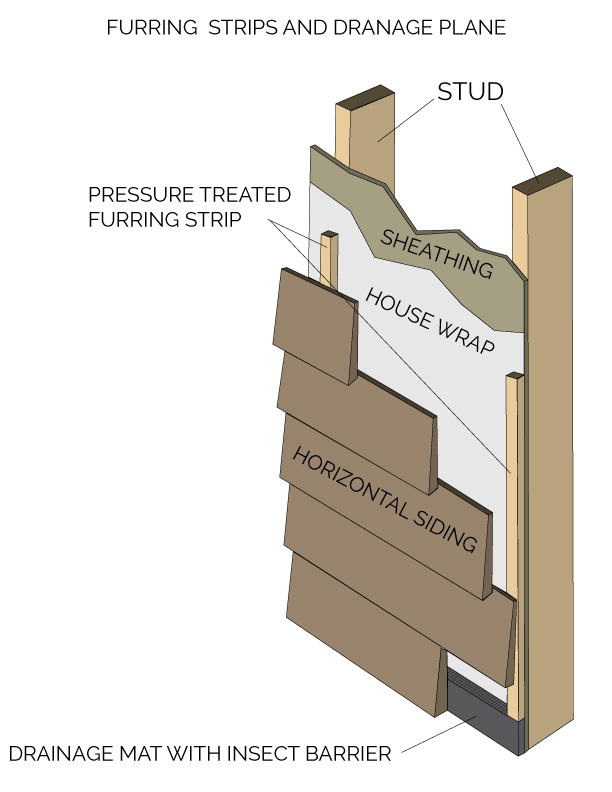
Natural wood siding should be installed over a weather-resistive barrier regardless of the sheathing material. A weather-resistive barrier is a vapor-permeable sheathing wrap that resists any liquid water that gets behind the siding, and acts as a drainage plane. There are three basic types of sheathing wrap: asphalt felt, Grade D building paper and plastic housewrap. In order to function as a drainage plane, a sheathing wrap should have an air gap between the wrap and the siding. (An appropriate vapor barrier, on the warm side of the insulation, should be used to reduce moisture movement from inside.)
Sometimes referred to as a “rainscreen” wall, the air space behind the exterior siding promotes drainage and ventilation, and allows the drainage plane surface to shed water back to the exterior rather than absorb it. Typically, a 1/8-in. to 1/2-in. air space between the sheathing wrap and siding is achieved by applying vertical furring strips over the wrap.
Should water find a way behind the siding, the vented space allows moisture to dissipate naturally, reducing premature
finish failures and directing water downward and outward, away from moisture sensitive materials. Corrugated sheathing wraps and three-dimensional drainage fabrics also have been developed to provide drainage, even when siding is installed directly against the material.
When sheathing material or sheathing wrap surfaces become wet, allow surfaces to dry before the wood siding is nailed into position.
Many patterns may be installed horizontally or vertically. Pattern orientation should restrict the entrance of moisture and weather. Some patterns, such as board-and-batten, may be installed only in a vertical fashion. Others, such as bungalow, bevel and drop, may be installed only horizontally.
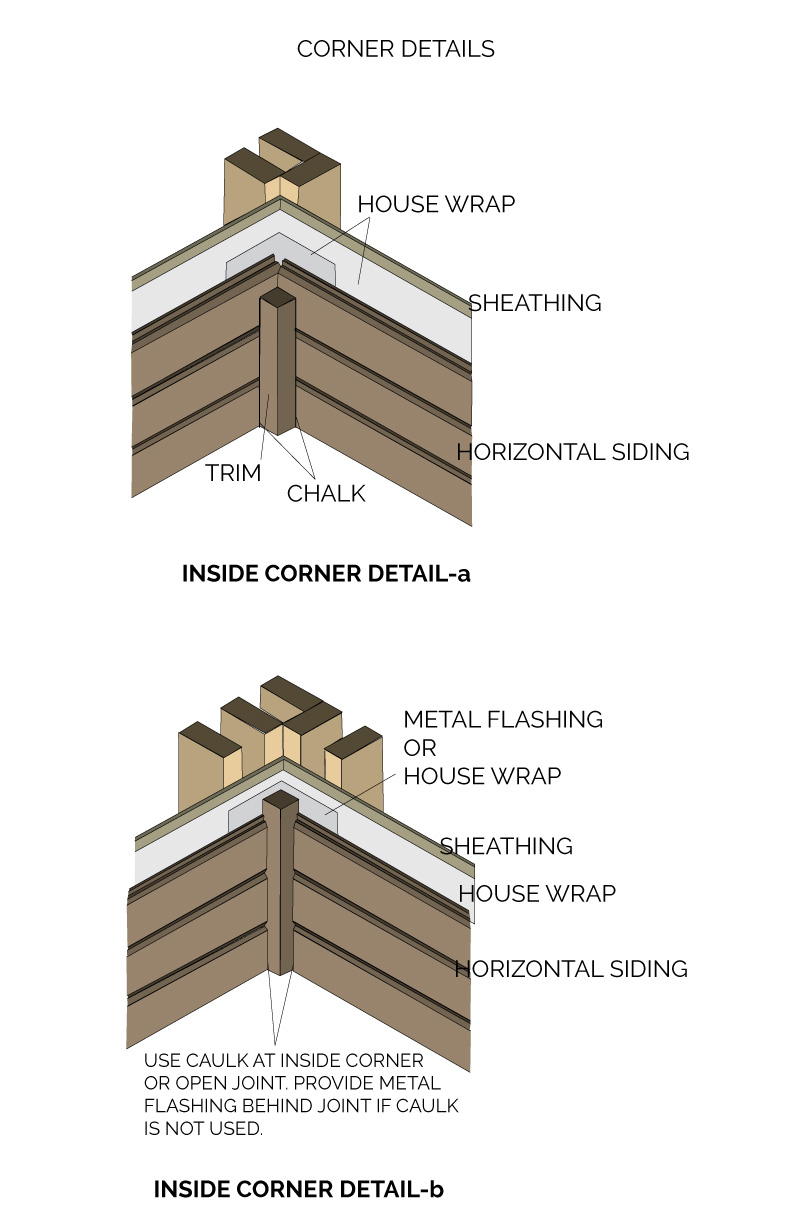
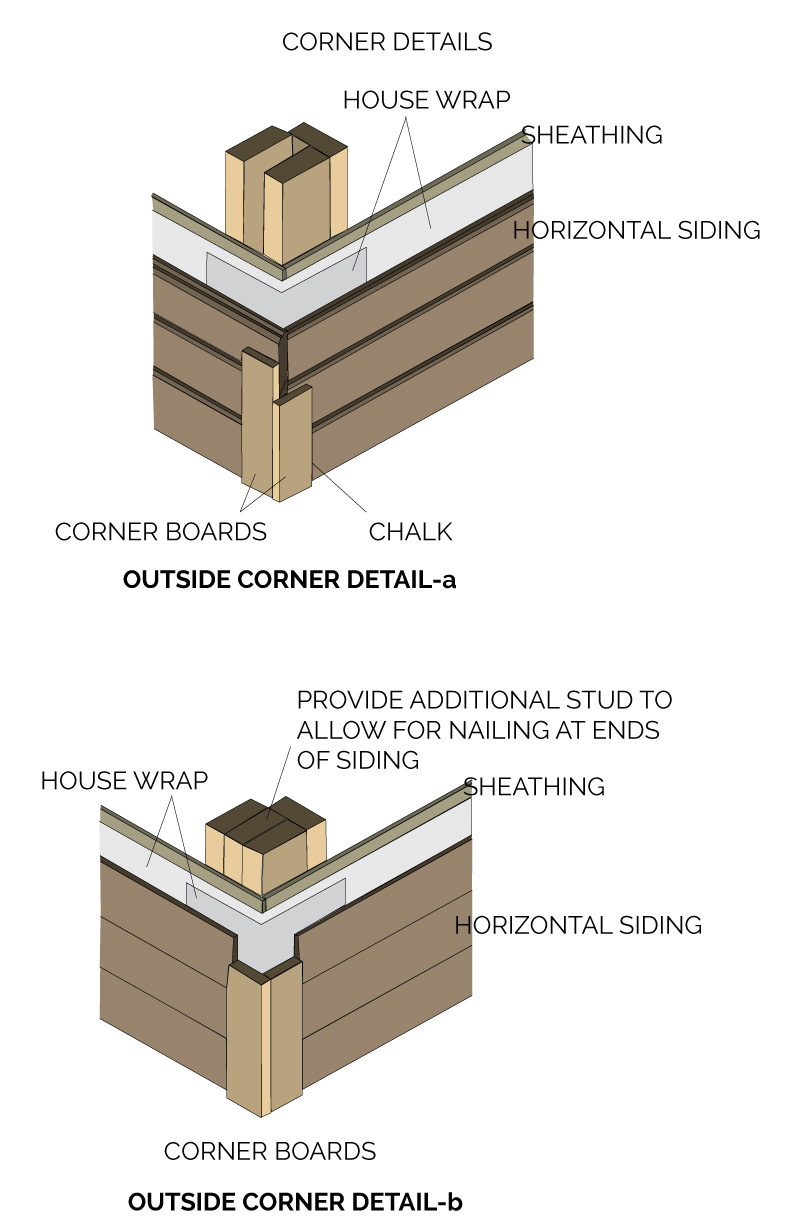
Where two pieces of siding meet—particularly in vertical applications—miter cut the ends at 45 degree angles to create an overlapping joint. Make sure the joints meet on studs, blocking or furring strips for secure nailing.
Use caulk where siding abuts openings or trim. Latex-silicone blends, polyurethane and polysulfide caulks should give satisfactory performance. Caulks made of 100% silicone are not recommended.
Theoretically, any pattern which can be installed in either direction, such as channel or tongued and grooved, can also be installed diagonally. However, diagonal installation tends to channel water directly into door jambs, window casings or other joinery details on a structure.
If siding is to be installed diagonally, the project must be designed from the outset to accommodate the direction of run-off.
When wood siding is installed over metal studs, concrete or masonry, provide 2x nailers of sufficient spacing and size to meet the nailing requirements. This procedure is sometimes used when wood siding is installed over foam sheathing.
Nails and Nailing
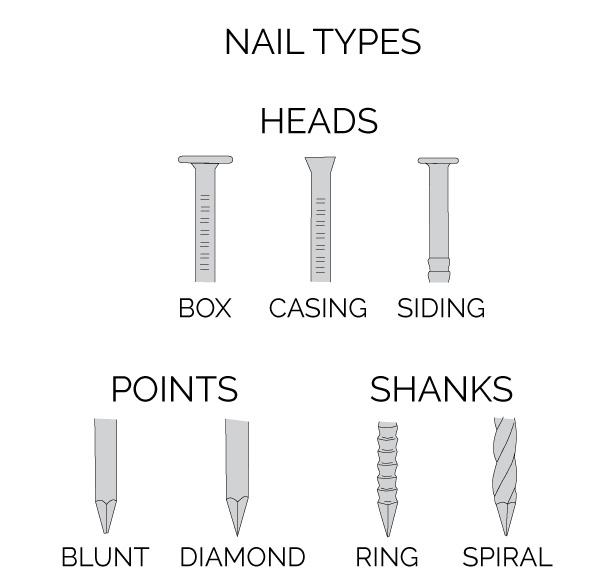
Correct nails and nailing practices are essential in the proper application of wood siding. In general, siding and box nails are used for face nailing and casing nails are used for blind nailing.
Recommended Nails
Nails must be corrosion resistant and preferably rust proof. Avoid using staples.
1. Stainless steel. The best choice.
2. High tensile strength aluminum. An economical choice. This nail is corrosion resistant and will not discolor or cause deterioration of the wood siding. However, aluminum nails will react with galvanized metal causing corrosion. Do not use aluminum nails on galvanized flashing (nor galvanized nails on aluminum flashing).
3. Hot-dipped galvanized. This nail is the least expensive, but may result in discoloration if precautions are not taken.
(a) Make certain the nails are of top quality, as the degree of protective coating varies with the hot-dip galvanization process.
(b) In some instances, the use of hot-dipped galvanized nails along with clear finishes on Western Red Cedar has resulted in stains around the nails. While this occurrence seems to be limited to the northeastern and north central regions of the country, the combination of hot-dipped galvanized nails with clear finishes on Western Red Cedar is not recommended.
(c) Plastic hammer-head covers can be used when driving hotdipped galvanized nails. This will reduce the potential for chipping and the subsequent potential for corrosion.
4. Other fasteners. Other types of corrosion-resistant fasteners may perform satisfactorily. Before selecting an alternative fastener, check with the fastener manufacturer to determine whether or not it is suitable with the species of wood used for the siding.
Avoid fasteners that may result in stains. Do not use staples or electro-plated nails. These fasteners often result in black iron stains which can
be permanent.
Copper nails are not suitable for Western Red Cedar as cedar’s natural extractives will react with the copper, causing the nails to corrode and resulting in stains on the siding.
While budgets are always a consideration, high-quality nails for solid wood siding are a wise investment. The discoloration, streaking or staining that can occur with inappropriate nails ruins the appearance of the project and can be very difficult to remove.
Nail Shanks
Many nails have smooth shanks and will loosen as the siding expands and contracts under the extremes of seasonal changes in temperature and humidity. Ring or spiral-threaded nail shanks will increase the holding power. Both types of shanks are readily available.
Nail Points
The most commonly used nail points include:
Blunt — reduces splitting.
Diamond — most commonly used.
Needle — should be avoided as needle points tend to cause splitting.
Nail Penetration and Spacing
Recommended penetration into studs or blocking, or into a combination
of wood sheathing and these members, is 1¹⁄₂”. Penetration is 1¹⁄₄” with ring shank nails.
Vertical siding, when applied over wood-based sheathing, should be nailed to horizontal blocking or other wood framing members not exceeding 36″ on center when face-nailed, or 32″ on center when blind-nailed.
Vertical siding, when installed without sheathing, should be nailed to wood framing or blocking members at 2″ on center. Some building codes require 24″ on center with or without sheathing; check your local code to verify requirements. Cut bevel (scarf) joints for vertical installations.
Horizontal and diagonal siding should be nailed to studs at 24″ on center maximum when applied over wood-based, solid sheathing and 16″ on center maximum when applied without sheathing.
The siding pattern will determine the exact nail size, placement and number of nails required. Nails are placed to allow the wood to move, that is to shrink and swell, as well as to adequately hold the siding in place.
As a general rule, each piece of siding is nailed independently of its neighboring pieces. Do not nail through two overlapping pieces of siding with the same nail as this practice will restrict the natural movement of the siding and may cause unnecessary problems. Nail joints into the studs or blocking members.
Drive nails carefully. Hand nailing is preferred over pneumatic nailing because there is less control of placement and driving force with pneumatic nailer. Nails should be snug, but not overdriven. Nails that are overdriven can distort the wood and may cause excessive splitting. Overdriven nails also provide an avenue for moisture to collect and
move through the piece. Pre-drilling near the ends will help reduce any splitting that can occur with thinner patterns.
For additional information regarding pneumatic nailing, contact the International Staple, Nail and Tool Association at www.isanta.org
Finishing
You don’t have to worry abut this step since Alpine Rustic Wood Products comes pre-finished ready to apply.
Alpine Rustic Wood Products are finished to achieve our signature Alpine Rustic look and feel. Our finishes not only enhance the appearance of the wood, but also protect the wood against the detrimental effects of water, mildew and ultraviolet light.

SNAKE RIVER ON FIR

SQUAW CREEK ON FIR

THE BROOKS ON FIR

BLACK MOUNTAIN ON FIR
